
Last Updated: November 7, 2026
Quick Summary
Photographing windshield damage at night works best when you park away from traffic, set your light down before you shoot, and angle a single small light from the side rather than straight on. Tap and hold your phone screen to lock focus and exposure on the chip, turn the flash off, and move closer instead of zooming.
- Park in a driveway, lot, or quiet side street and keep your body behind the car.
- A bullseye chip reads best with light at roughly 30 to 45 degrees, slightly off to one side.
- Turn the flash off and lock focus and exposure by tapping and holding on the damage.
- Skip digital zoom and move the phone closer, a few inches from the glass.
- Send one wide shot, one close-up with a coin for scale, and one shot from each side.
Table of Contents
- Set Up Safely Before You Photograph Windshield Damage at Night
- How to Avoid Glare When Photographing Glass
- The Best Lighting for Glass Photography After Dark
- How to Take Pictures of Car Damage That Show the Chip
- Documenting Windshield Damage With Photos: The Evidence Checklist
- Fixing Blurry, Glary, or Unusable Night Photos
- Text Your Photos to ClearPath for a First Assessment
- Frequently Asked Questions
Set Up Safely Before You Photograph Windshield Damage at Night
Photographing windshield damage at night starts with one decision most people skip: where you park. Your phone can capture a chip in near-darkness, but no photo is worth standing in a live lane. Customers can text a photo of the damage for a quick first assessment, and the shots that help most are taken from a safe, still position.
Pick a location away from traffic
Move the car off the roadway first. A driveway, a parking lot, or a quiet side street beats a shoulder every time. Turn on your hazard lights if you are anywhere near moving vehicles, and keep your body behind the car, not beside it.
Do not crouch in traffic to chase an angle.
Stage your light source before you start
Set your flashlight or phone light down before you kneel. A light you have to hold in one hand while you frame a shot with the other will shake. Prop it on the hood, a step stool, or a second person's steady hand.
Get the light and your body position settled first. Then take the photo.
How to Avoid Glare When Photographing Glass
Glare comes from a light source reflecting off the glass back into your lens. The fix is often about where the light and your body sit relative to the windshield. Learning how to avoid glare when photographing glass is mostly about moving yourself, not fiddling with menus.
Kill the reflections behind you
Look at what is behind your phone. A streetlight, a porch light, or your own headlights will bounce straight off the glass and into the shot. Turn off the headlights. Step so the bright object is not lined up with your lens and the chip.
If you can, shoot with a dark background behind you. A dark garage or a shadowed wall gives the glass less to reflect.
Change your angle, not your settings
Small moves beat big menu changes. Shift left or right a few inches and watch the glare slide off the chip. Tilt the phone slightly and the reflection moves with it.
- Move your body, not the car
- Angle the light from the side, not straight on
- Take one shot from each side of the chip
The Best Lighting for Glass Photography After Dark
A single small, controllable light held at a low angle to the glass is a practical choice for photographing damage after dark, and the angle you choose can change with the damage you are trying to show. A side angle rakes across the surface and can make a chip or crack cast a shadow, which often makes the damage easier to see in a photo. Straight-on light can wash out the damage.
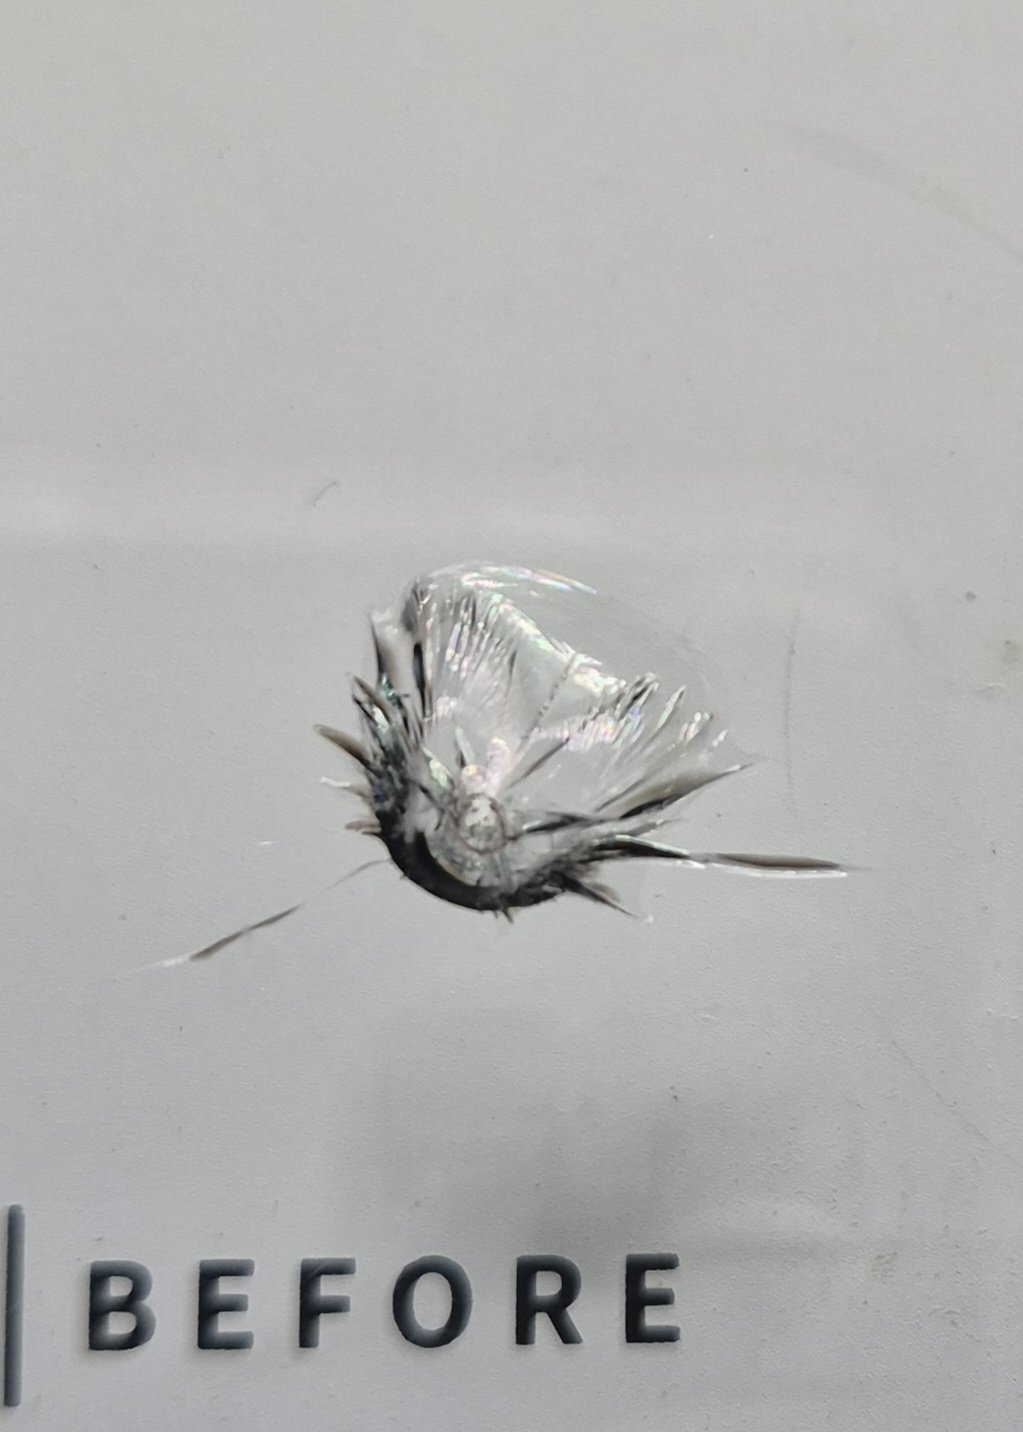
Match the light angle to the damage
A bullseye chip, the round impact mark with a dark center, reads best when the light comes in at roughly 30 to 45 degrees from the glass surface and slightly off to one side. That low rake throws a shadow into the pit and lights up the ring around it.
A crack is different. Because a crack is a near-vertical break through the glass, it disappears when light passes straight through it and reappears when the beam hits it from the side. Walk your light along the crack and stop where the line goes brightest, then shoot from there.
Control the beam, not just the position
A bare flashlight throws a wide, hot circle that blows out the center of the frame. Cup your hand around the lens, wrap the light in a piece of paper, or use a phone light with a narrow beam to shape it into a smaller spot. A tighter beam lets you light only the damage and leave the rest of the glass dark, which increases contrast and keeps reflections from the surrounding area out of the shot.
Holding the light in the same hand as the phone can put the beam at the wrong angle and shake the frame, so setting the light down or having a second person hold it often helps.
Use a second light only for context
If you want a wide shot that shows where the damage sits on the windshield, add a dim second light aimed at the hood or the cowl, not at the glass. That gives the frame some shape without adding a reflection to the windshield itself. Keep the damage light as the brightest thing in the photo so the eye, and the camera's exposure, locks onto it.
Here is how the light angle should change with the type of damage you are shooting.
Damage type | Light angle | What it does |
|---|---|---|
Bullseye chip | Roughly 30 to 45 degrees, slightly off to one side | Throws a shadow into the pit, lights the ring |
Star break | Sweep light slowly, shoot where most legs are lit | Shows more of the radiating structure |
Crack | Hit it from the side, stop where line is brightest | Makes the near-vertical break reappear |
Scratches and scuffs | Very low, almost parallel light | Skims glass and catches scratch edges |
How to Take Pictures of Car Damage That Show the Chip
A photo that shows car damage clearly needs three things: a close camera, sharp focus on the glass, and light that reveals the chip. Most blurry night shots fail on focus, not on lighting. If you want a deeper walkthrough on framing a chip, our guide on how to photograph a windshield chip covers the best angles.
Phone camera settings for low light
Tap the screen to focus on the chip itself, not the background, then press and hold that spot until the focus and exposure lock. Locking exposure matters at night because the camera otherwise keeps re-metering as you move, and a bright reflection can drag the whole frame dark.
Turn off the flash. The flash fires straight into the glass and creates a hot spot that hides the damage. If your phone has a night mode, use it, but understand that night mode takes several seconds and blends frames, any hand movement during that time turns the chip into a smear. Rest the phone on the hood or brace your elbows on the car and hold still until the shutter finishes.
- Tap and hold to lock focus and exposure on the damage
- Flash off
- Night mode on if you have it, and hold still while it works
- Leave digital zoom alone, move the phone closer instead
Focus and depth of field through glass
Get the lens close to the glass, a few inches away, and let the camera lock focus on the chip. A close lens-to-window gap cuts down on reflections between your phone and the glass.
Digital zoom is the most common reason night shots of glass look soft. Zooming in crops the sensor and amplifies noise, and at night there is little light to spare. Move your body closer and use your feet as the zoom.
Watch out: autofocus loves to lock onto a reflection on the glass surface instead of the damage behind it, if the chip looks soft but the reflection is sharp, tap the chip again and confirm the focus box sits on the damage, not the glare.
Documenting Windshield Damage With Photos: The Evidence Checklist
Documenting windshield damage with photos means building a small set of images that shows size, location, and condition, not just one close-up. A technician can read a good set in seconds. A single dark, glary photo tells them almost nothing.
- One wide shot showing where the damage sits on the windshield
- One close-up of the chip or crack with a coin or ruler beside it for scale
- One shot from each side so the light hits the damage differently
- A photo of the whole windshield from outside the car
- A note of the date and which vehicle
For cracks, showing length accurately matters. Our step-by-step guide on how to show windshield crack length in a photo walks through it.
Fixing Blurry, Glary, or Unusable Night Photos
Blurry night photos usually come from movement, not from a bad camera. Rest the phone on the hood or a steady surface and tap the shutter gently. If the shot is glary, move your light to the side and step out of the reflection.
If the image is too dark, get the light closer to the glass rather than turning up your screen brightness. Take several shots and keep the best one. You do not need a perfect photo, just a clear one.
Text Your Photos to ClearPath for a First Assessment
Once you have a clear set of shots, the fastest next step is to send them. You can also see which windshield damage photos get an accurate repair quote to make your shots count.
Most chip repairs take about 30 minutes, and we come to your location. Chip repair is $89, and each additional chip is $30. You can get a free quote or review mobile windshield chip repair details before you text. For warranty details, see our warranty page.
Night photography of glass is a skill, but a clear photo is the difference between a guess and a real quote. ClearPath Mobile Auto brings chip and crack repair to your driveway, with upfront pricing, a certified technician, and same-day appointments when available.
Frequently Asked Questions
How do you photograph windshield damage at night without glare?
Turn off your phone flash and light the glass from the side with a separate flashlight or a second phone. Stand so no bright light source sits behind you, and move the camera a few inches closer or farther from the glass until the reflection slides off the damage. Shooting at a slight angle rather than straight on usually removes the worst glare and lets the chip or crack read clearly in the frame.
What lighting works best for photographing windshield damage after dark?
A small handheld flashlight held low and to one side works better than overhead light or a camera flash. Raking light across the glass at a shallow angle casts tiny shadows inside a chip or along a crack, which is what makes the damage visible in a photo. Take one shot with side light and one with a wider ambient shot so the damage can be located on the windshield.
How many photos should you take to document windshield damage?
Aim for a set rather than a single shot: one wide photo showing the whole windshield and where the damage sits, one close-up of the chip or crack, one with side lighting to show depth, and one with a reference object or a coin beside the damage for scale. Four to six photos usually give enough detail for a first assessment by text.
Can you photograph windshield damage clearly in low light with a phone?
Yes, if you steady the phone and add your own light. Brace the phone against the glass or rest it on the cowl, tap the screen to lock focus on the damage, and avoid digital zoom, which softens detail. Most chip repairs take about 30 minutes once the damage qualifies, and a clear photo set helps with a first assessment and quote.
